Please scroll to the bottom of the page for the different versions you can purchase of the .
We are understandably proud to offer you the very best in Second Life. Packed with every conceivable extra; the offers performance that is without compromise as well as excellent value for money.
We didn't think the limited capabilities of notecards did our latest product justice, so this web page was created to provide you with the full low-down on the product.
Dance Machine Features
- Allows up to 50 couples (100 individuals) to dance your couples dances, just buy your dances once and everyone can use them, no matter what the permissions.
- Clears all poseballs from your dance floor.
- Allows the use of couples dances on no-rez land via our free Poseball Server system.
- Dance anywhere in the sim! Couples dance balls are automatically sent to your location when you want to dance. Remote calling posts and scripts are provided to make it easy to extend to another venue in the same sim.
- Includes a freely distributable Access HUD making dancing even easier - See TIS Access HUD for a list of HUD features.
- Easy addition of dances - no configuration notecards necessary, no
loaders
charging to load your dance machine, no sending off for settings, no renaming of animations. Just drop the animations straight in, or use the easy set-up script to send the animations direct from your couples poseballs. The dance machine does the rest! - Compatible with every couples dance animation in Second Life, this includes dances in poseballs and those in animation packs.
- Only asks for animation permissions once per dancer per visit.
- Preloading of sequenced dances. No more waiting mid dance for the next part of it to load! Now dances such as Bits and Bobs Slow Dance V7 are smooth flowing and uninterrupted.
- Group your dances into categories in the menu, e.g. Romantic, RandB, Country etc. up to a Max of 10 categories.
- Change the names of your dances to be displayed in the menus.
- Menus automatically display in the language of the dancer. Easily configure menu levels and change dance names using our 1 step web based set-up.
- 3 dance modes for both couple and single dances:
- Menu - Each couple gets their own menu and can choose their own dance.
- Synchronized - All dancers dance the same dance at the same time, chosen from the admin menu.
- Random - Every couple dances a random dance at a random time. Clicking the dance machine changes the dance.
- Automatic height adjustment for couples dancers.
- Low lag scripting - UserModule scripts are switched off when not filled. (Standing script time of 0.005ms). Number of dance slots can be easily changed by removing or adding additional scripts.
- Don't be stuck with one design, choose from a range of 24 particle based or sculpted icons, and a number of attractive external designs - all configured using the menu.
- Customize or hide floating text above the dance ball.
- Administration menu can be set to be accessed by owner, by group, or additionally from a set list of people.
General Information
- Copyable, so you always have an extra copy in your inventory for when the Linden gods decide to break something!
- Only 3 prims.
- Owner or group controlled, or set up an access list to grant control to specific individuals
- Full control over the dance machine. Control who dances what and when!
- Resizeable design.
- Fully supported by our friendly and knowledgeable team.
- Free updates for the life of the product.
Versions Available
The machine comes in 4 versions, so you will always find the perfect version for your needs.
All animations are available to purchase in store if they are not included in your chosen version. Please note that animations contained within your machine are now Bento animations.
This machine comes with 1 Couples Dance only.
- 1 Couples Dance - Won't Cha
Next step up from the Standard version, the Plus Version comes with 4 Couples Dances!
Listed below is all animations you get with this version of the :
Couples Animations (4):
- All Yours
- Dont Cha
- Waltz
- Wont Cha
Next step up from the Plus version, the Fully Loaded Version comes with 6 Couples Dances!
Listed below is all animations you get with this version of the :
Couples Animations (6):
- 2 Hearts
- As One
- All Yours
- Dont Cha
- Wont Cha
- Waltz
If you have cash to spend and want it all? No problem! This machine comes with every dance possible!!! In total you receive 11 Couples Dances! WOW!
Listed below is all animations you get with this version of the :
Couple Animations (11):
- 2 Hearts
- As One
- All Yours
- Dont Cha
- Wont Cha
- Waltz
- Off Ur Trolley
- Off Ur Rocker
- Off Ur Nut
- Easy Street
- Forever Mine
Current version of the is v.
Release date of the current version is . To check what version you are running please see the Version section. Please also see the Troubleshooting tab if you are having any other issues to see if your query is answered there before contacting support.
From version 1.2 of the , uses an Experience to automatically allow avatars accept those pesky permissions to animate!
In order to set this up on your land, you will need to do the following:
On your client tool bar at the top of your screen go to World and then select Parcel Details if you are using the Firestorm client, select About Land if you are using the Second Life Client.
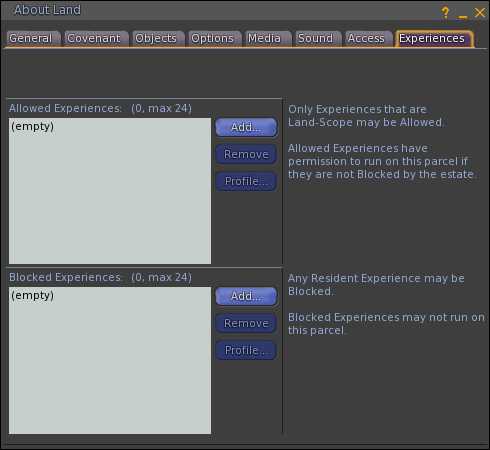
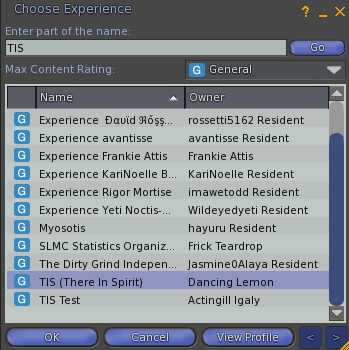
In the Experiences tab, click the Add button on the Allowed Experiences section.
In the Choose Experience dialog that pops up, search for TIS and then select the TIS (There In Spirit) experience, make sure the owner is Dancing Lemon.
Your comes in a product box. Drag this box to the ground where it will automatically unpack and give you a folder containing your product. Accept this folder and it will appear in the top level of your inventory. You can now delete the product box (a copy is still in your inventory).
In your inventory, locate the folder called "TIS ".
In this folder you will find the following items:
- TIS
- This is the unit which is just waiting to be used! It is copyable so you can use as many as your venue requires.
- TIS extra User Modules
- These are the extra User Modules you may want to use for more dancers to be able to use the machine. Please see Changing the number of dancers for more information.
- TIS Couples Calling Post
- This is a calling post which can be placed out for use to call the main dance machine. This is very useful if you have a large venue and it is impossible to your customers to click the main ball to dance. Please see Creating other calling points for more information.
- TIS Couples Mirrorball Calling Post
- This is another calling post but looks like a Mirrorball. Same functionality! Please see Creating other calling points for more information.
- TIS Poseball Server
- Allows the use of couples dances on no-rez land. Please see poseball server system for more information.
- TIS Couples Pose Ball Setup
- This script is used for loading Couples animations into the dance machine. More information can be found in the Adding Couples Animations section.
- TIS Couples Remote Script - Drop in your own prim
- This script can be dropped into your own prim to render it a calling post for the Couples Dance Machine. Please see Creating other calling points for more information.
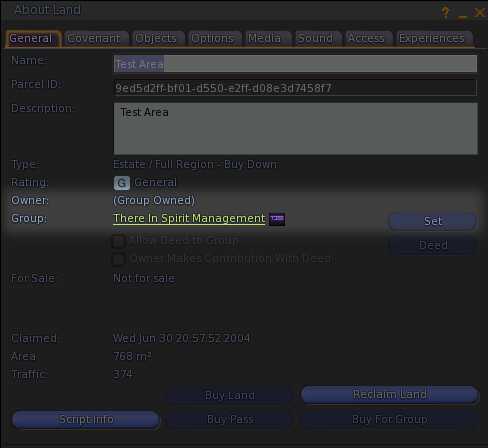
The dance machine firstly needs to be rezzed under the land owning group. To check what group your land is set to, open the About Land dialog box (using the client toolbar, go to World > Parcel Details). If your land is not owned by a group you can set this here.
In order that the can use couples dances that you load into it, the land settings where the dance machine will be located will need checking in order that the machine can rez poseballs for avatars to dance couples dances.
When you first drag out the TIS in world the dance machine will go through an initial setup and check that it has permission to rez couples poseballs on the land it is on. The land settings "Build" option needs to be set like this:
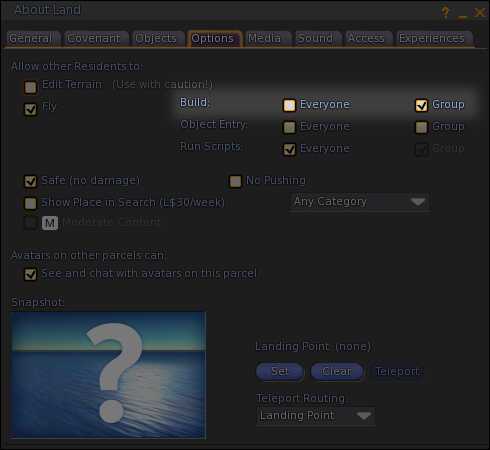
The machine will state in chat certain messages dependant on the land settings:
If you receive this message the land is set up correctly and you can then proceed with the set up.
TIS : Poseball creation check - PASSED
If the was rezzed on land and is not set to the land owning group, you will see a message like this:
TIS : Poseball creation check - FAILED - Unable to rez poseballs when owner is offline. Please set (not deed) the dance machine to the group that owns the land, or place a deeded TIS Poseball Server on this parcel.
If the was rezzed on land that is group owned, but the group cannot create objects, you will see a message like this:
TIS : Poseball creation check - FAILED - Land is group owned, but members of the group cannot create objects. Either allow the group to rez, or place a deeded TIS Poseball Server on this parcel.
If the was rezzed on land that is not owned by you, and is not set to the land owning group, you will see a message like this:
TIS : Poseball creation check - FAILED - Unable to rez poseballs. Please set (not deed) the dance machine to the group the land is set to, or place a TIS Poseball Server on this parcel.
If the was rezzed on land that is not owned by you, has no land owning group, and only the land owner can create objects, you will see a message like this:
TIS : Poseball creation check - FAILED - Land is individually owned, and only the land owner's objects are allowed to rez. Please ask the land owner to place a TIS Poseball Server on this parcel.
If you own the land and have set the machine to the land owning group, but you do not wish to have group members allowed to build, then the only way to provide the machine to rez poseballs is to use the TIS Poseball Server that came with your package.
More information about the TIS Poseball Server can be found here.
If the machine advises that the Poseball creation has Passed, the machine has an inbuilt function that allows users of the TIS Fusion to dance their own dances using their Fusion. This, we found, was a good way of customers being able to use their own couples dances in clubs they frequent!
Before you use your machine please check your land settings to make sure that the machine can rez its poseballs for couples dancing.
After setting up your land and receiving the Poseball PASSED message, you should also see in chat the following messages:
TIS :
Please accept the permissions dialog when requested.
You will need to accept the drop down at this stage.
TIS : Load of Hovertext notecard complete.
TIS : Load of Access notecard complete. Free Memory: 18638 bytes.
TIS : Poseball creation check - PASSED
TIS :
Retrieving dance settings - Please wait....
TIS : Settings for 1 couples dances received and menu constructed successfully. - Free memory: 42608 bytes
If the machine cannot rez it's poseballs, the message as to why will be presented in chat to you. You only need to follow the details in the chat.
If you have purchased the Standard Version of the machine go to Purchased Standard Version heading below.
If you have purchased either the Plus Version, Fully Loaded Version or the Xtreme Version, go to Purchased Plus Version, Fully Loaded Version or the Xtreme Version below. This also gives information about loading the dances that come with your machine.
If you purchased the Standard Version:
To switch the dance machine on and access the menu system, left click on the dance machine and hold your mouse button down until the menu appears. The menu drops down and enters admin mode.
TIS : Dance Machine switched On.
You can now start using your machine!
If you purchased either the Plus Version, Fully Loaded Version or the Xtreme Version:
- Navigate to your folder in your inventory. There will be an object called 'TIS version Dances' (version refers to the version of the machine you have purchased). Drag this object out in world next to your Couples Dance Machine. On dragging this object out next to your CDM it will state in chat:
TIS version Dances:
Please type into chat /1 load if you wish to load these animations into a TIS Dance Machine.Type /1 load into your chat.
TIS version Dances: Scanning for TIS dance machines...
- You will then get a drop down menu asking whether you wish to load the dances into your dance machine. Click the tick mark to start the loading. When the animations are loaded you will receive this message:
TIS version Dances: Load of animations completed.
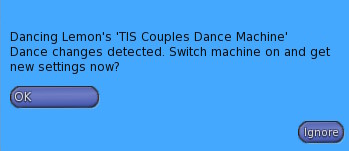
TIS : Animation inventory changes detected - Switching off dance machine. Please switch the dance machine on (click and hold) once changes are complete to load new settings. - On clicking and holding your mouse button on the machine a drop down will appear and you will then have to click OK.
- The machine will then state in chat:
TIS : Dance Machine switched On.
TIS : Retrieving dance settings - Please wait....
TIS : Settings for n couples dances received and menu constructed successfully. - Free memory: n bytes - Your machine is now ready to use.
If you have purchased either the Plus Version, Fully Loaded Version or the Xtreme Version, we have also included in the package of dances a !!! Settings !!! notecard for your use if you want. The !!! Settings !!! notecard included in the dances has our animations already assigned to specific categories. When you load the dances into the machine the dances will be assigned to the General category. If you replace the !!! Settings !!! notecard that currently resides in your machine with the one included with the dances when you Manage your dances they will be assigned to categories for you to either keep or change to your own.
There are a number of methods of adding additional Animations to your . Please thoroughly read each section and familiarize yourself with each aspect.
If you have purchased a pack of Couples Animation, simply do the following:
- Right click the machine and choose edit.
- In the edit window, select the content tab.
- In your inventory, find the folder that contains the pack of couples animations.
- You can either drag each animation in one at a time to the contents tab of the machine or select multiple by clicking one animation then holding down CTRL and selecting the others.
- You do not have to drag any notecards that came with the pack of animations into the machine as the settings are obtained automatically and therefore do not require a settings notecard for the dances.
- For all couples dances, there will be animations for both the female and the male. Multi part couples dances will have more than 1 animation for each gender. Please make sure you put all animations required into the machine.
- Once you have added your animations the machine will say in chat:
TIS : Animation inventory changes detected - Switching off dance machine. Please switch the dance machine on (click and hold) once changes are complete to load new settings.
Follow the instruction to switch the dance machine on. When you do a drop down box will appear:
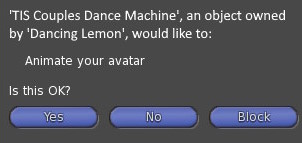
Selecting OK will then contact our database of dances and obtain the settings for dances you have loaded into the CDM. You may also have another drop down box presented to you which is asking for permissions, you must say Yes to this in order that the machine completes its setup:
Once the machine has retrieved its settings it will state in chat the following:
TIS : Settings for n couples dances received and menu constructed successfully. - Free memory: n bytes
If you wish to rename or group animations into different menus, select Manage > Dances from the admin menu.
If you have purchased a Couples Animation which came in Poseballs that are Modifiable, simply do the following:
- Right click the poseballs and choose edit.
- In the edit window check 'Edit Linked Parts'
- Left Click on one of the poseballs so it is highlighted.
- In the edit window, select the content tab.
- Drag the script 'TIS Couples Pose Ball Setup' from your inventory into the content tab of the edited poseball - A message will appear over the poseball indicating it is waiting for the other poseball script. The CDM will also say in chat:
Now drop the TIS Couples Pose Ball Setup script into the other pose ball. (child prim or Root prim - check 'Edit Linked Parts' to select it).
- Left click on the other poseball and drag another 'TIS Couples Pose Ball Setup' script into its contents. The setup scripts will now work out the dance settings and send your dances to the dance machine. You will get 2 drop downs asking for permission requests, you must accept these for the machine to carry on with the set up. If successful the CDM will then say in chat:
Locating Nearest Dance Machine...
Communication Established With Indicated Dance Machine. Attempting to identify dance settings. - Please accept the two permission requests!
Dance Information Received - Transferring animations to dance machine.
TIS : Animation inventory changes detected - Switching off dance machine. Please switch the dance machine on (click and hold) once changes are complete to load new settings.
Setup for dance poseballs name of dance complete. Your animations have been transferred to the dance machine. Touch poseballs to remove setup scripts.
Click the poseballs to remove the script and the poseballs will say in chat "Returning poseballs to original state". You can then take the poseballs back into your inventory. - Please see the section below about new animations in SL.
Follow the instruction to switch the dance machine on. When you do a drop down box will appear:
Selecting OK will then contact our database of dances and obtain the settings for dances you have loaded into the CDM. You will also have another drop down box presented to you which is asking for permissions, you must say Yes to this in order that the machine completes its setup:
Once the machine has retrieved its settings it will state in chat the following:
TIS : Settings for n couples dances received and menu constructed successfully. - Free memory: n bytes
If you wish to rename or group animations into different menus, select Manage > Dances from the admin menu.
If you have purchased a Couples Animation which came in Poseballs that are Non Modifiable, simply do the following:
- Drag out the poseballs and right click the poseballs and choose edit.
- In the edit window check 'Edit Linked Parts'
- Left Click on one of the poseballs so it is highlighted.
- In the edit window, select the content tab.
- In the contents tab you will find one or more animations, drag these from the contents tab into a folder in your inventory. You do not require the 'Waiting' animations that the creators put in the poseballs only the dance animations themselves. If you want to double check whether the animation is a waiting animation, just double click the animation, and select 'Play in World' on the little box that appears on your screen.
- Left click on the other poseball and drag out the animations in there into the folder in your inventory. You do not require the 'Waiting' animations that the creators put in the poseballs, only the dance animations themselves. If you want to double check whether the animation is a waiting animation, just double click the animation, and select 'Play in World' on the little box that appears on your screen.
- Once complete, take the poseballs back into your inventory.
- Right click the CDM and choose edit.
- Select the contents tab.
- Drag the animations you obtained from the poseballs into the contents tab of the CDM.
- Once you add your animation it will say in chat:
TIS : Animation inventory changes detected - Switching off dance machine. Please switch the dance machine on (click and hold) once changes are complete to load new settings.
Follow the instruction to switch the dance machine on. When you do a drop down box will appear:
Selecting OK will then contact our database of dances and obtain the settings for dances you have loaded into the CDM. You will also have another drop down box presented to you which is asking for permissions, you must say Yes to this in order that the machine completes its setup:
Once the machine has retrieved its settings it will state in chat the following:
TIS : Settings for n couples dances received and menu constructed successfully. - Free memory: n bytes
If you wish to rename or group animations into different menus, select Manage > Dances from the admin menu.
If you are the first person to add a particular dance to a couples dance machine anywhere in SL using the script called "TIS Couples Pose Ball Setup" and adding the script to each of the poseballs, the script will gather information about the dance by asking you to sit and stand from the poseballs. If this occurs simply follow the on screen instructions. Dance settings will be reviewed by our team and will normally be available within a few hours. You will receive an IM once this has been done.
If this procedure happens to you, please leave the poseballs out in world so that the script can periodically check for the settings to become available.
When the settings have been reviewed by our team, you will be notified by IM that the settings are available.
If you have left out your CDM and the poseballs for the dance that requires settings, this will automatically load the dances into the CDM within an hour of them being available.
Note it is very rare to encounter this scenario as only the first person in SL to load a new couples dance into a will see this setup procedure.
If you have added a pack of couples animations directly into the machine and they do not automatically appear in the couples menu then please contact Customer Support as these will need adding to our database.
In addition to using animations as their creator intended to dance couples and singles dances, the CDM allows you to create custom singles and couples dances from the animations contained in it. For example you can stitch a number of singles dances together to make one extended dance, use part of a couples dance as a singles dance, or create a mirrored couples dance from one single dance.
To do this you simply need to create some new settings lines in your !!! Settings !!! notecard as follows:
To create a custom couples dance made up of one or more single animations, create a line in your !!! Settings !!! notecard in the following format:
C•menu level•menu name•male pos•male rot•female pos•female rot•male anim 1|female anim 1|length•male anim 2|female anim 2|length•male anim 3|female anim 3|length
Note: The maximum length of a line in a notecard in Second Life is 255 characters. If your custom couples dance creates a line longer than this you can simply move onto the next line starting with a •
For example:
C•Romanced•MyCouple•<0,0,-0.5>•<0,0,0,1>•<0.118,-0.321,-0.175>•<0,0,0,1>
•single dance 1|single dance 1|15
•single dance 2|single dance 3|22
•single dance 4|single dance 4|13
The above example creates a custom couple animation called MyCouple in the Romanced category, using Single Dance 1 as a mirrored couples dance from one animation, and using single dance 2 and single dance 3 to create a couples dance from two separate single dances. Please note that only one set of positional information can be set per custom dance.
It is not currently possible to create sequences from two or more couple dances. This is because each couples dance has its own unique rotation and position settings, which would result in unnatural sliding from one position to another when transitioning between the dances in a sequence. If you have a number of couples dances that have the same rotation/position settings you could create a custom couples animation out of them (see above: Custom Couple Dances), however you should be aware that even though the rotation/position settings are the same, this does not mean the dancers will start/end in the same position on each dance and you should expect unnatural sliding to occur.
To remove any animations from the machine, simply do the following:
- Right click the machine and select edit.
- In the Edit dialog box click the Content tab.
- Find the Animation you wish to remove. If the Animation is a copyable animation, you just right click the animation and select Delete. If the Animation is a transferable animation, you will need to drag the animation from your machine contents back to your inventory as deleting it will remove it from your ownership.
Once you have removed the animation from your machine the machine will state in chat:
TIS : Animation inventory changes detected - Switching off dance machine. Please switch the dance machine on (click and hold) once changes are complete to load new settings.
Follow the instruction to switch the dance machine on. When you do a drop down box will appear:
Selecting OK will then contact our database of dances and obtain the settings for dances you have loaded into the CDM. You may also have another drop down box presented to you which is asking for permissions, you must say Yes to this in order that the machine completes its setup:
Once the machine has retrieved its settings it will state in chat the following:
TIS : Settings for n couples dances received and menu constructed successfully. - Free memory: n bytes
Once you have loaded some dances into the machine you can change the default menus and names of the dances that people see in the menu using the Manage Dance web page. Also visit this web page if you have loaded dances that do not appear in the menus.
To access the web page from the admin menu, choose Manage > Dances.
The web page consist of a minimum of 2 and a maximum of 4 tabs, depending on the animations you have in the dance machine.
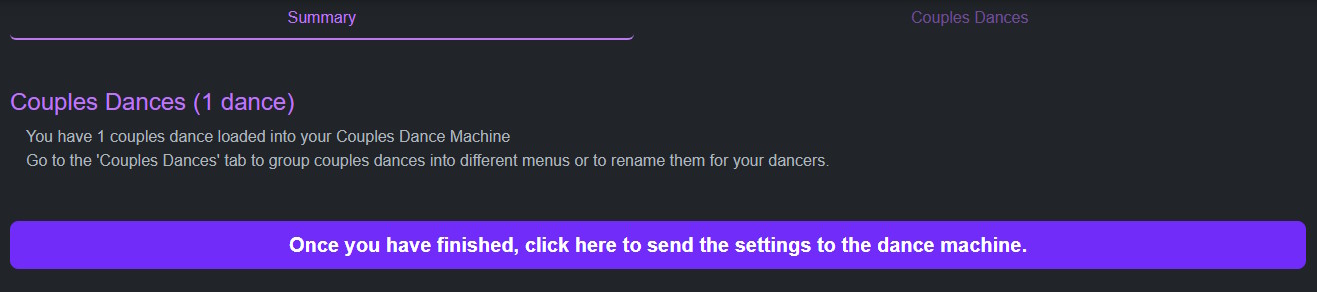
This tab details the dances you have in the machine, and whether they are loaded successfully, awaiting settings, or unknown. There are also instructions with what to do in each case.
The button at the bottom sends any settings collected for the loaded dances back to the machine. On clicking this button you will be presented with a screen like this:
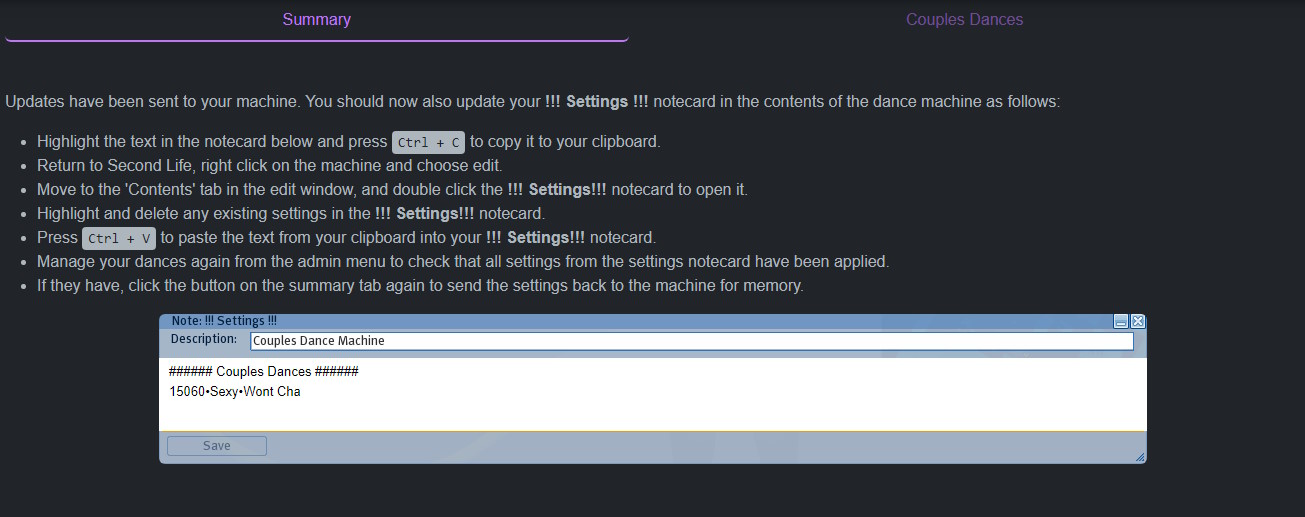
This text inside the "notecard" can be then pasted into your !!! Settings!!! notecard in the contents of the dance machine in order to save your menu settings.
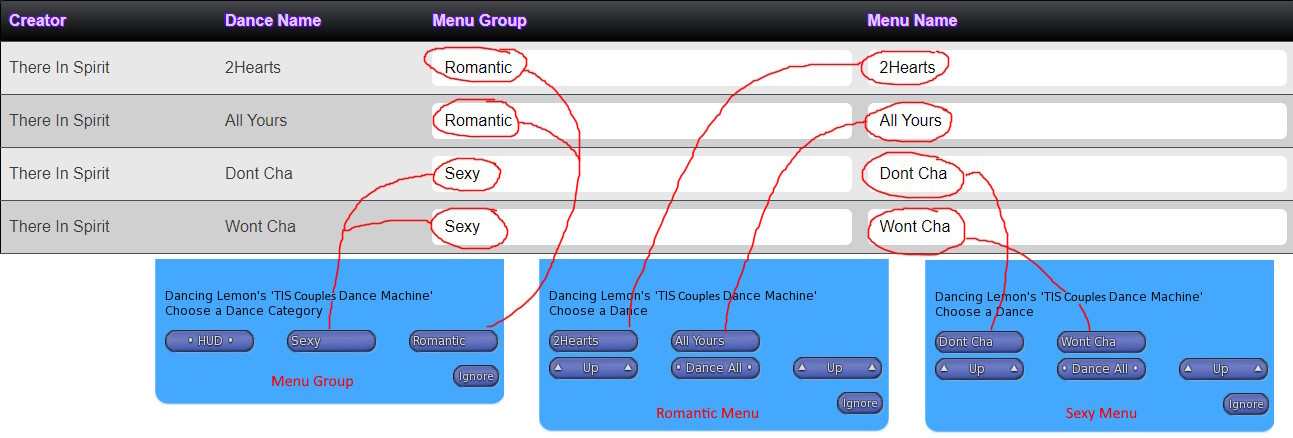
This tab contains a list of all couples dances in the machine, and the Menu Group (categories) and Menu Name of each dance. You can amend the name to whatever you like, and group the dances into different menu levels, you can use a maximum of 10 group categories for the dances. If you use more categories, your dances will not show in the menu, so please bear this in mind. For example the following setup would produce menus as shown:
Once you have amended the list to your liking, click the button at the bottom of the Summary tab to send the settings back to the dance machine. The contents of this should be copied into the !!! Settings!!! notecard in the contents of the dance machine in order to save your menu settings. Follow the instructions on screen to do this.
If you see this tab then you have most likely purchased a newly created dance and its settings are awaiting verification by our team. Settings are typically available within 24 hours. Check back at regular intervals to load the settings to your machine. Note: you will need to visit the manage page or reset the dance machine in order to get settings as the machine will not automatically pole for them in order to reduce lag.
If you see this tab then you have animations in the dance machine that the system does not recognise. Follow the instructions on screen to deal with these if the situation arises.
The issues are explained as follows:
- Missing Animations
- This indicates you have part of a couples dance in the machine that is missing one or more of its animations. Check your original poseballs/inventory to locate the animation that is missing.
- Waiting Animation
- This animation is not a dance. It is included with some couples poseballs and plays whilst waiting for a partner to sit on the other poseball. You should remove this animation from the Couples Dance Machine.
You must have a partner to dance couples dances!
- Once you have added your dances, click the dance machine.
- On the first use of the machine, you will have two options:
- The machine uses Second Life Experiences, see SL Experiences for more information about SL Experiences. See our section Getting Started on how to set up the TIS Experience. On the first initial use of the machine, it will ask whether you wish to be part of the TIS There In Spirit Experience. If you click "Yes" then you will no longer have to grant permissions to dance, clicking one of our dance machines that have granted the TIS There In Spirit Experience anywhere in SL you will just get the menu to choose a dance.
- The dance machine will ask you for animation permissions if not already granted or you are not part of the TIS experience.
- Once granted a set of poseballs will appear immediately above your head.
- A set of poseballs will appear above your head.
- Sit on one of the pose balls and have your dance partner sit on the other.
- Your partner will receive an animation permission request if not already granted.
- If the dance mode is set for Via menu (default), you will now receive a drop down menu from which to choose your dance (only when a partner has sat on the other poseball).
- Choose a dance and off you go!
- To bring up the menu at any time, either click on the main ball, or say /1 menu in chat, or, if using the HUD, click the menu icon.
- To re sync your dance with your partner, either select ReSync from the menu or type /1 sync in chat. If you have the dance HUD you can also click the resync icon.
Please note, in order for you to dance a couples dance, you will need a partner. Our in store demo ball is set up so you can demo the dance ball without a partner, but this is only for the demo ball not the purchased ball.
Animations are usually created by animators for a certain size of avatar, especially couples dances which will assume the two avatars are of similar size. The dance machine automatically adjusts your height so you are always on the floor, however if you are very tall or very short, you can use page up/page down to adjust your position to suit the dance you are doing. If using the HUD you can also press the height adjustment icons to move your avatar.
Contained in the folder you will find an object called "TIS Couples Dance Machine Extra UserModules". Contained in this object are a number of scripts (51 - 100) that allow people to dance on the machine. These can be added to the machine to allow a total of 100 people to use the machine at any one point.
By default the dance machine comes configured (loaded) to allow up to 50 people (25 couples) to dance. The dance machine utilises a unique scripting technology that switches off unused scripts so they do not impact server resources, however you may wish to either add or remove user slots to suit your requirements. This is easily accomplished by adding or removing the scripts named ~UserModule 1 to 100 from the machine. Note that a script is required for each person, so scripts should be added or removed in multiples of two.
Included in the package are calling posts. One called "Calling Post" and the other "Mirrorball Calling Post". Multiple calling points can be set up to make it easier for people to call for couples pose balls or the menu when dancing. Calling Posts can be placed out at multiple locations on the same sim. Clicking a Calling Post is the same as clicking on the machine itself. The "Calling Post" will also change its style to match that of the .
When you first rez out one of the calling posts it will state in chat:
TIS : Linked to TIS Couples Dance Machine
In addition a script called "TIS Couples Remote Script" is included with the package which allows you to create your own calling post from your own objects, such as a venue specific sign.
To do this, create a prim, which will represent your "Couples Calling Post" and drag the "TIS Couples Remote Script" into it. You can then just click your object which will then call up the dance menu from the Couples Dance Machine.
Want to change the hovertext floating above your machine? No problem! To do this just follow these steps:
- Right click the machine and choose edit.
- In the edit window, select the content tab.
- Find the notecard in the content tab called !!! Hovertext !!! and double click to open it.
- Follow the instructions in the notecard to change your floating text.
- Click the save button at the bottom of the notecard to save your changes.
- Close the notecard down and close the edit dialog box down. The machine will state in chat:
TIS : Inventory changes detected - Identifying changes...
TIS : Load of Hovertext notecard complete.
The machine should automatically register these changes and display the hovertext as you have set it in the !!! Hovertext !!! notecard.
It is possible for you to have multiple machines out in the same sim. This is useful if you have certain venues that you wish only to have certain dances used in. When setting out multiple machines please bear in mind however that in order to have the same dance in each machine you must either purchase multiple transferable dances or have a copyable version of the dance. Just because the machine is copyable does not render your dances as such!
Changing Channels
You can have multiple machines customized in different ways on the same sim. To do this you will need to set the channel number for each machine and a calling post.
To do this simply amend the description field of the Machine and the Calling Post so that they have the same channel number as follows:
- Right click and select edit on one of the machines.
- In the general tab of the edit dialog box locate the description field this will already have text in there like this:
Channel(0-9):0
- Set the new channel by editing this text so for example
Channel(0-9):3
would set the channel to be 3. - Whilst in edit mode of the product, reset the scripts. Depending on what Second Life Client you are using this can usually be found in the Build Menu > Scripts > Reset Scripts on Firestorm or in the Build Menu on the Second Life Viewer 2.
- Repeat the above steps for the Calling Post ensuring that you set the same channel as above.
- Now fill your dance machine with dances and test out the calling post with your machine to make sure it is connected to it. If you find it is not, just do a reset on the scripts again as above.
In the folder containing your product, you will see an object called the TIS Poseball Server.
For full information about this object and its uses, please see here.
Second life can - and often does - lose inventory. Scripts provided to assist with loading of content have proved to be more reliable than manual inventory transfers, however you use them entirely at your own risk. None of our products contain any code that deletes inventory, and we cannot be held responsible for any loss of animations or other content from our products.
Please do not contact us to recover lost inventory, as we are powerless to do so. Instead please report the loss to Linden Labs and vote for improvements to Second Life's inventory system here.
Thank you for your understanding.
Current version of the is v. Release date of the current version is .
To check the version of this product you are running please follow these steps:
- Access the Admin Menu by left clicking and holding down your mouse button on the product.
- In the dialog box that drops down the version number for the product you have can be found here where it states "Your Version: Version". Version is the version number of your current product.
If you are running an out of date version, please obtain a redelivery of the product package from our redelivery board in our store, Click here to go there!
Listed here are the most common FAQ's for this product. Before contacting support, make sure your query is not answered here.
- Version 1.20 - 03/04/2023
-
- New poseballs with more accurate sit target so feet are on the floor
- New HUD with more accurate discovery of dance machines and more functionality
- Redesigned menu system preventing script errors in certain languages
- New mesh calling post that accurately mimic the look of the machine and new realistic mesh mirrorball calling post
- Redesigned Sync'd and Random dance modes for a better dancing experience
- Version 1.11 - 18/07/2013
-
- New feature - To enable automatic loading of all TIS Couples Dance packs and TIS Couples Dances in poseballs when rezzed next to the dance machine.
- Fix to Linden Labs Viewer 3 bug that causes objects rezzed whilst invisible to fail to render when turned visible (such as the poseballs). See https://jira.secondlife.com/browse/VWR-29389 . The new poseballs use a transparent texture rather than alpha prim setting.
- Version 1.10 - 04/08/2011
-
- Fusion Integration
- Redesigned menu system - Now much quicker
- Redesigned Dance Settings Storage - Machine now capable of holding significantly more dances.
- Poseballs now cross parcels with error trapping if SL prevents this
- Redesigned web interface for Manage Dances - Now identifies incomplete couples and waiting animations
- Redesigned Couples Poseball Setup Script - Timing now more accurate also more error handling
- Introduction of Poseball Server - Allows machine to work on Group Owned Land when group cannot rez
- Many stability fixes and speed enhancements
- New update functionality for future releases
- Version 1.02 - 28/06/2010
-
- Resolved issue with "Dance All" menu selection only looping the first dance if no menu levels were used.
- Version 1.01 - 12/06/2010
-
- First Release