Thank you for your interest in the TIS .
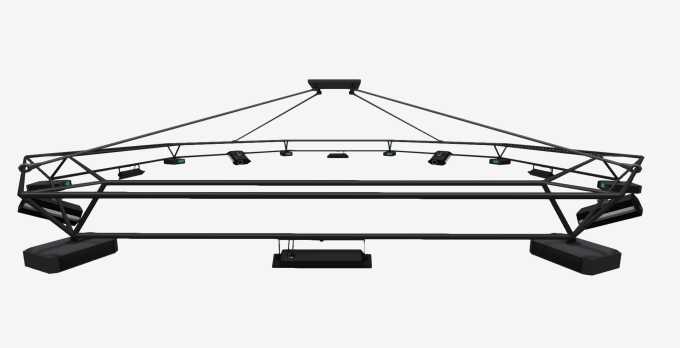
Revolutionize your club atmosphere with TIS's flagship lighting product - the - a hyper-realistic synchronized lighting display using projector lighting that can keep time with your streaming music.
No other lighting product in SL can match the sheer beauty of the hypnotic displays the Aurora is capable of producing. Check out the video for a quick taste!
Display
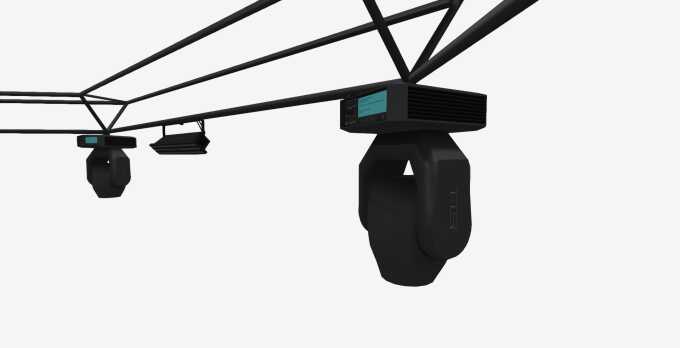
- True to life lighting display consisting of 8 moving heads, 4 lasers with 11 different beam styles, and 4 ambient washes
- Projector lighting offers the most realistic visual experience
- Light movements are synchronized creating mesmerizing displays
- Used in conjunction with the TIS StreamSync the lights display will be synchronized with the music playing on your parcels media stream.
- Pre loaded with 50 Gobos, and ability to add your own!
Build
- Based on real-life lighting equipment, each components look and display has been tailored to be as realistic as possible.
- Highly detailed 100% mesh design.
- Realistic texturing to every component.
- Just 22 prims for entire display.
- Scripting has been rigorously optimized to reduce sim overhead.
Convenience
- 7 Presets included or easily create your own.
- Fully copyable - set out as many as you need.
- Resizeable - easily set the diameter of the rig to between 5m and 50m
- Prim beams can be easily removed if you prefer projector only lighting.
- Globally set the light range and intensity to prevent bleed to neighbouring parcels
- Easily control speed to reduce load on laggy sims if required.
Control
- TIS iControl Professional included, quickly and remotely start presets, or set the tempo/time signature for the display.
- Presets can also be chosen through a built-in menu system accessed via the iControl
- Allow selected others or your group to control the product.
Current version of the is v.
Release date of the current version is . To check what version you are running please see the Version section. Please also see the Troubleshooting tab if you are having any other issues to see if your query is answered there before contacting support.
On purchase you will be delivered a folder containing a box for your and a box for the TIS iControl Professional which controls all our products compatible with the iControl.
First drag the box to the ground where it will automatically unpack and give you a folder containing your product. Accept this folder and it will appear in the top level of your inventory. You can now delete the product box (a copy is still in your inventory). Then drag the TIS iControl Professional box to the ground which will unpack and give you another folder containing the iControl. You need only to use one iControl to control multiple products.
In your inventory, locate the folder called TIS
.
In this folder you will find the following items:
- TIS
- This is the unit. It is copyable so you can use as many as your venue requires.
In your inventory, locate the folder called TIS iControl Professional
In this folder you will find the following items:
- TIS iControl Professional
- The TIS iControl Professional is the controller for this product. You will be able to use this controller to change various functions for the product. For more information about basic functionality of the iControl Professional, please see here.
First locate the "TIS " in your folder and drag it out to the ground in world.
Your lights will not work straight out of the box until the beams are rezzed. This products functionality can only be controlled by the iControl Professional. Please see the Using the iControl section for full details on finishing the set up, checking whether the beams can be rezzed on your parcel and how to use your product with your iControl Professional.
You will also find a notecard in the contents of the unit which allows you to adjust certain aspects of the product. Please see the Settings section for more information how to adjust these.
For best results and to fully appreciate the , we recommend that you have the following client settings:
Set your World to Midnight!
To set your world to midnight to appreciate the lighting display, go to your client toolbar menu and select World > Sun Position > Midnight or click Ctrl + Shift + X
Obviously the will function perfectly well when it's daytime too, but when it's midnight.... Just WOW!
NOTE: As with any projector light, the properties of the surface the product shines on will affect the how the projection looks. In particular, projector lights will not be seen on full bright surfaces as they are already at their maximum brightness.
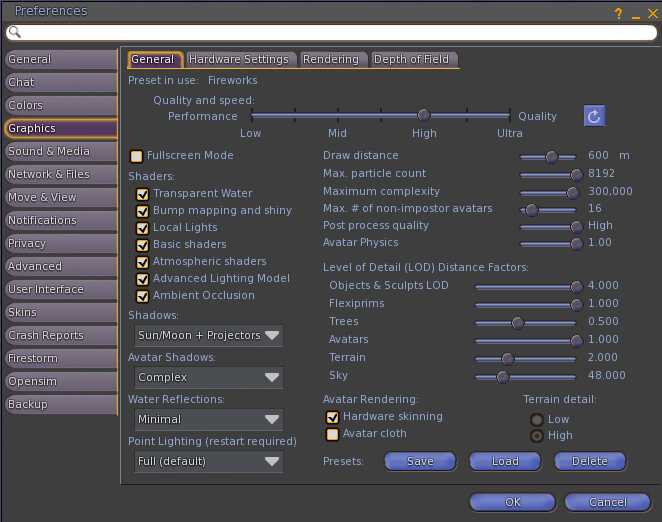
Graphic Preferences
We also recommend for optimum viewing pleasure that you set your graphic preferences to the following settings if your computer graphics can handle it. To open your Preferences window please click Ctrl + P. Set your Performance up to High and tick the Advanced Lighting Model box, the Ambient Occlusion box, set shadows drop down to Sun/Moon + Projectors. Also set your draw distance to about 600 or higher. Please make sure that you set your Objects & Sculpts LOD to 4.0 and Max particle count to max (8192).
Drag out the iControl Professional from your inventory to the ground in world or right click and select wear from your inventory to wear the controller as a HUD. If you require other people i.e. staff or managers to be able to control the product a controller must be out on the parcel that your product is located on. For more detailed instructions on how to use the iControl Professional, please see the TIS iControl Professional web page.
When first worn or dragged to the ground the iControl Professional will quickly establish connection to any devices available. The products communication channel is set to 0 by default. More information regarding communication channels and why you would ever want to use them can be found in the information page of the TIS iControl Professional. Information on how to change the channels can be found in the section Multiple Units using different settings.
Once the iControl Professional has established connection to the product you will see an icon appear representing the product at the bottom of the controller in the Product Selection panel.

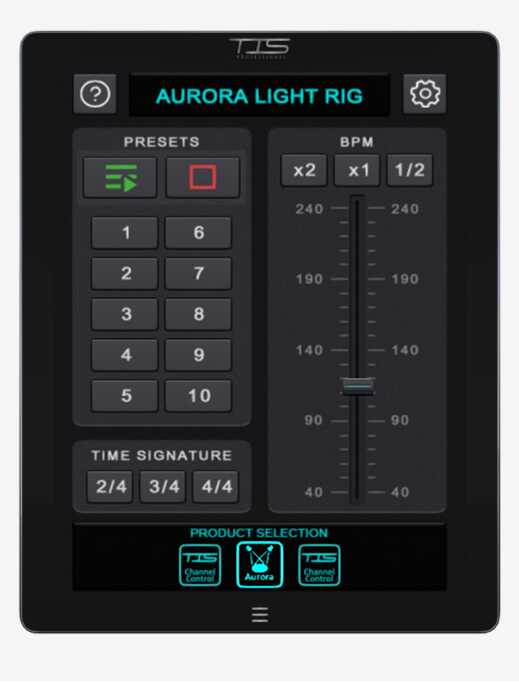
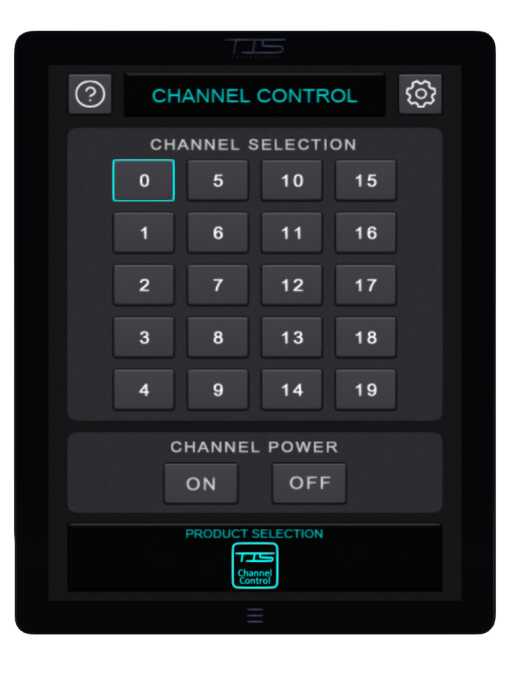
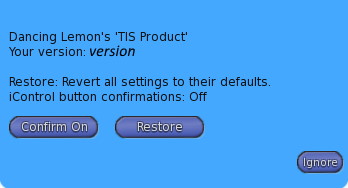
Click the icon for TIS and you will be presented with this screen:
To finish setting up your you must first check you can rez your light beams. To do this you need to go to the Configuration section.
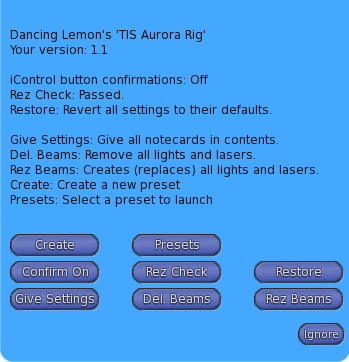
On pressing this button , the configuration drop down will appear which will give you the options for the product. If you have multiple 's out the configuration button will control all lights on that channel, not just the one it states on the drop down.
The first thing to do in order that you can start using your new lights is to perform a Rez Check.
This restores the products sliders to their default state. It also acts as a reset, in which it will reset the values of the product to "factory state". This is very useful if you are dragging out multiple units as if you have changed any values, the newly dragged out unit will still only have the factory default settings. If you drag out two units pressing this Restore button will make sure that both units are displaying the same settings. This will not overwrite any adjustments made to any of the preset notecards.
On pressing this button will allow the product to notify in chat confirmations of button presses. This is especially useful so the owner or admin can know what settings have been changed when they click any of the buttons. The default setting is off.
On clicking this button, the will check the land settings to make sure that the can rez its light beams.
If the was set up correctly you should get the following message in chat:
TIS : Rez Check passed - Beams can be created here.
If you receive this message you can successfully Rez Beams.
If the was rezzed on land that is group owned, but the group cannot create objects, you will see a message like this:
WARNING: Unable to create Beams. Land is group owned, but members of the group cannot create objects. Please allow group members to Build in the About Land dialogue.
If the was rezzed on land that is group owned but only the owner of the display can rez under that group not the group itself. You will get a message like this:
WARNING: Unable to create Beams. Unable to rez lights when owner is offline. Please set (not deed) this to the group that owns the land.
If the was rezzed on land that is set to a group but the has not been rezzed under that group, you will get a message like this:
WARNING: Unable to create Beams. Please set (not deed) the to the group the land is set to.
If the was rezzed on land that only the owner of the parcel or sim can rez, you will see a message like this:
WARNING: Unable to create Beams. Land is individually owned, and only the land owner's objects are allowed to rez. Please talk to the land owner to get permission to rez here.
If the cannot decipher what is causing it to fail then you will see this message:
WARNING: Unable to create Beams. Unable to determine rez fail reason - Please contact TIS Support
After performing a rez check and having the confirming the Rez Check has passed, you will need to click the Rez Beams button. This will rez all the light beams onto the rig itself. Your is now ready for use!
Pressing this button will delete the light beams. This is especially useful if your beams have become another victim of SL's server issues. Most all issues can be resolved by deleting the beams then re rezzing them again.
On pressing this button the will state in chat to you:
TIS
: Preparing Notecards - Please wait.
TIS
: A folder called 'TIS
Notecard Backup date' containing backup notecards has been delivered to your inventory.
The will then send you the settings notecards stored inside the machine itself. The settings notecards will be contained in a folder in your inventory.
This is especially useful if you are having an issue with programming a light display and you have run into trouble, you can back up your notecard presets and send them through to the support team. You might even get asked to send these through if the support team think it will help resolve any problems.
On pressing this button, this will direct you to the website where you can create your own presets.
Using the Parameters guide, you can select the different commands and add them to a notecard to use in your system.
The when viewing the iControl Professional will show only 10 presets. The can actually store any number of presets. We felt giving users 10 presets to view on the iControl was more than enough, but if you are going to be creating a lot more then this button on the Configuration dropdown is where you can view all presets loaded in your .
When you click the Preset button a dropdown will appear and listed will be all the Preset notecards loaded in your rig. You only need to click a number corresponding to your preset to start that preset playing. The play all button will run through all presets.
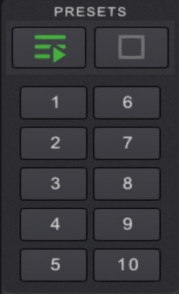
The comes with 7 in built preset displays. Each of these presets can be customized to suit your venue if you so wish. To customize any of these presets please see the Customizing Presets section in these instructions. The Green button when clicked plays ALL presets in turn, the Red button stops the lights.
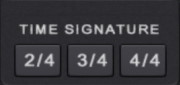
These buttons will change the time signature from the standard 4/4 beat to either a 2/4 beat or 3/4 beat. This is very useful if a song that is playing is not the standard 4/4 beat! This represents the number of beats per bar. Most popular songs have a time signature of 4 beats per bar (expressed as 4/4), or more rarely 3 beats per bar (3/4)

This slider allows you to adjust the Beats Per Minute for a specific song. The buttons at the top allow you to quickly multiply this set BPM to suit the song currently playing. If you own a TIS StreamSync and it is set up correctly, the BPM will automatically change to be in time with the music on your parcel.
This section is for more advanced user settings. You can use the product directly out of the box using the iControl Professional, but if you wish to have multiple units out on your sim with different settings you need to change channel communications.
To have more than one unit out, all you need to do is drag another from your inventory to the ground in world. If you require both units to be controlled with the same settings etc., then you need not do anything further with either unit, just use channel 0, which is the default channel number, on your controller to start, stop and adjust the other settings as usual.
Once you have placed the number of units you wish to have out you will then need to Restore
the units, by going to the Configuration via the iControl Professional. This will reset the values to factory state
. This is very useful if you are dragging out multiple units as if you have changed the colour to multi colour the newly dragged out unit will still only have the factory default settings. If you drag out two units pressing this Restore button will make sure that both units are displaying the same settings.
If you have more than one unit rezzed on the same sim and set to the same channel, one will become the master
. This master will perform all the script work to calculate colours/effects and then send the result to the other unit's, enabling all of them to synchronize their displays. As a result the Settings for the master will be used for all unit's. The master
will be chosen at random so you should ensure that this notecard is duplicated in all your unit's set to the same channel in order to achieve a consistent effect.
If you wish to have multiple units customized in different ways on the same sim, this can be done easily by setting one of your units to have a different channel to your first unit. To do this you will need to set the channel number for each additional unit.
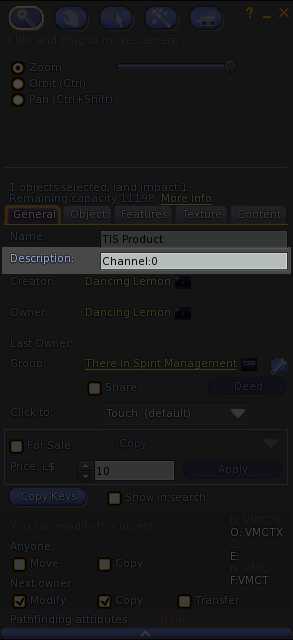
To do this simply amend the description field of one the units as follows:
- Right click and select edit on one of the units.
-
In the general tab of the edit dialogue box locate the description field this will already have text in there like this:
Channel : 0
-
Set the new channel by editing this text so for example
Channel : 3
would set the channel to be 3. - If you are using Firestorm viewer go to the Content tab of the edit dialogue box and click the "Reset Scripts" button. If you are using the Second Life Viewer, you will need to go to the client tool bar (at the top of your screen) and click Build --> Scripts and then select "Reset Scripts". Any other viewer, you may need to refer to the viewers knowledge-base.
- On clicking Reset Scripts a dialogue box may pop up if you have never done this before asking you whether you wish to modify scripts in selected object - Just click yes - if no box asking that pops up, then the Reset Progress box will only appear and start going through each script in the unit and set them to running as in this example:
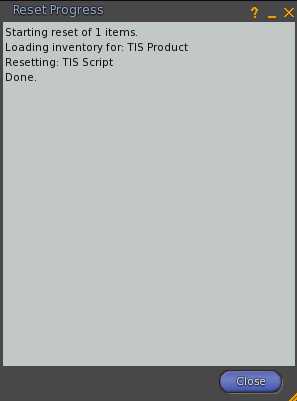
- When the dialogue box states done, press close.
- The unit that you changed will run through its setup.
You can now go to your main Control Channel page and in the Channel Selection panel select the new channel you set to now control the unit on that channel.
Do the above for any units that you wish to have on any other channel. You have in total 20 channels that you can use if you so wish.
If you edit your product and go to the contents tab where the presets are kept, you will notice a !!! Settings !!! notecard.
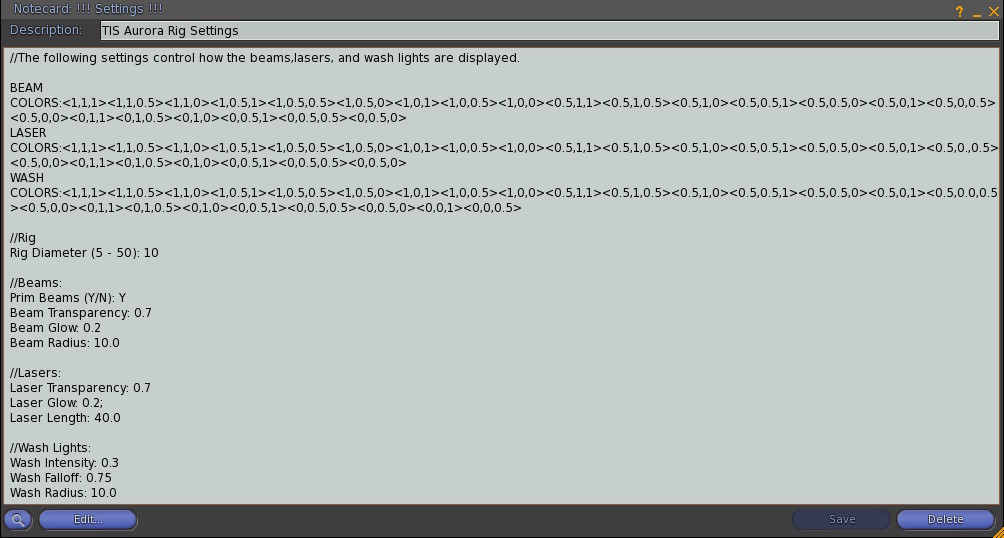
Here you can stipulate the colours that the product uses and also the frequency that the colours change. If your venue has a certain colour scheme, then you can add those colours here, removing any others that you do not require.
BEAM COLORS:
This settings to allow you to set the default colors for the BEAM lights to use. Very useful if you have set colors for your venue. If you REM these out by adding // in front of the setting the default colors will be used, i.e
//BEAM COLORS: will stop the colors listed from only being used.
LASER COLORS:
This settings to allow you to set the default colors for the LASER lights to use. Very useful if you have set colors for your venue. If you REM these out by adding // in front of the setting the default colors will be used, i.e
//LASER COLORS: will stop the colors listed from only being used.
WASH COLORS:
This settings to allow you to set the default colors for the WASH lights to use. Very useful if you have set colors for your venue. If you REM these out by adding // in front of the setting the default colors will be used, i.e
//WASH COLORS: will stop the colors listed from only being used.
//Rig:
This settings to allow you change the size of the rig itself. The default size is 10m diameter. The max diameter you are allowed is 64m diameter and smallest is 5m diameter. When you have set a size and click save on the notecard, when the confirmation that the notecard has been loaded in chat, you will need to re rez the beams. Please see the Configuration section.
//Beams:
Prim Beams (Y/N): - You can either have the beam lights on show or when set to N, the beams will not be visible only the projector light on the floor. If you change this setting please re rez the beams via the Configuration Menu.
Beam Transparency: - This setting is for the transparency of the beams, you can make them more or less transparent by changing this setting.
Beam Glow: - If you wish the glow of the beams to be more or less then this setting can achieve that.
Beam Radius: - This setting refers to how far the projector light reaches.
//Lasers:
Laser Transparency: - This setting is for the transparency of the beams, you can make them more or less transparent by changing this setting.
Laser Glow: - Function is the same as the Beam Glow.
Laser Length: - This setting refers to how long the laser is. Useful if you have a venue with neighbours as you can reduce the length to stop the lasers going through your neighbours land.
//Wash Lights
Wash Intensity: - Intensity is a light property that affects how bright a light is. Light colour can also affect intensity. The higher the number the more intense the light is.
Wash Falloff: - This setting is for the falloff of the light itself. Falloff basically means how quickly the fades out.
Wash Radius: - Function is the same as the Beam Radius.
When any changes are made to the notecard, press save and wait for the confirmation:
TIS
: Loading notecards - Please wait...
TIS
: Notecards loaded.
Once you have received the confirmation, turn off your product to enable the product to take these settings then switch back on.
The comes with 7 in built preset displays that can be started from the controller or from the configuration dropdown menu itself. Each of these presets can be customized to suit your venue if you so wish. You also have the functionality to create your own user presets in addition to the 7 in built presets.
Please note that only the owner of the product can make changes to presets. Even if you have people added to the access list this function is not permitted in Second Life objects.
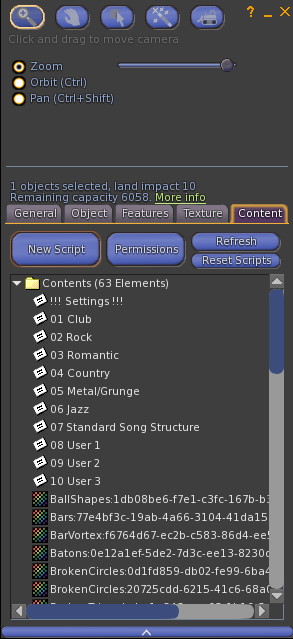
To customize any of the presets, you will find the preset notecards contained within the contents of the (not the controller). To see these, right click on the rig and select Edit from the menu. Then click the Contents tab.
We have created some simple presets that may be of use in your venue. We think we have covered the most common of venue styles!
If you wish to make any changes to the in built Presets then double click the notecard in the . This will open the notecard to present you with all the commands pertaining to the specific light display.
There is ONE parameter line per command.
Please see the Parameters section to see how each command affects the look of the lights.
Note: Leaving any parameter blank will result in a random value being chosen for that parameter. Colour parameters can accept multiple values similar to the COLORS: command.
Three additional blank notecards 08 User 1, 09 User 2and 10 User 3 are included to enable you to create your own additional displays. If you wish to create any further presets, just create another notecard in your inventory, name it to identify what it refers to and drag the notecard into your rig contents like this:
presetnumber name
Such as: 08 MyShow
To amend any of the presets or create your own light display's, double click the specific notecard to open it. Using the Parameters as a guide, add lines into the notecard specifying what parts of the light rig to change and how they should look. You can see examples of the settings in the existing preset notecards. The following additional functions are available to fine tune controlling your display.
COLORS:[<R,G,B><R,G,B><R,G,B> etc. |DEFAULT]
Sets the default colours (those used when colours are not specified for a command) from that point on in the display. You can set certain colours for the Beams, Lasers and Wash lights independently.
SLEEP:BAR|BEAT|TIME:VALUE
This specifies how long to pause between each command. It is IMPORTANT that you add a sleep between commands if you do not wish them to be produced simultaneously - there is no automatic pause to let the previous command finish.
BPM:[BEATS PER MINUTE|HALF|NORMAL|DOUBLE]:[TIME SIGNATURE]
This command sets the beats per minute, time signature and beat multiplier for the currently running display. It is included so you can create displays to match a particular piece of music without having to manually set these values each time.
LOOP START
This specifies the start of a loop.
LOOP:NUM
Specifies the number of times to repeat each command encountered since LOOP START. Note: the number specifies the additional number of times to run the commands, hence LOOP:1 will play the enclosed commands twice, once for the first run and then once for the loop. Loops can be nested but care should be taken to ensure each LOOP START has a corresponding LOOP:num command.
PRESET:[Exact name of preset notecard]
This command allows you to follow on to another preset that is contained in the
.
The also allows the use of Gobos to create an effect for the beams.
The comes preloaded with 50 Gobos to start you off with. You can also add your own textures into the contents or the system to allow you to customize your own lighting effects.
To add your own textures, just drag a full perm texture into the contents of the . You can adjust your beam presets to show only that texture or leave blank to randomize the gobos contained in the system. Please download the Aurora Rig Parameters or see the Parameters section for more information about this.If you require a specific Gobo that came with your system, you must use the UUID (contained within the name of the texture), just select the UUID from the name of the texture like this:
Texture in system: BallShapes:1db08be6-f7e1-c3fc-167b-b3757393a883
UUID is: 1db08be6-f7e1-c3fc-167b-b3757393a883
Just put the UUID into the preset row for the beam like this:
BEAM::::::1db08be6-f7e1-c3fc-167b-b3757393a883:AUTO
The Aurora Rig consists of beams, lasers and wash lights. Each of these has a specific set of parameters that control how the light operates.
These are explained below, along with a set of general commands that affect the preset itself. If you wish to create a notecard in your inventory for these parameters, highlight the text in the notecard below and press Ctrl + C to copy it to your clipboard then paste it into a notecard in world.
Alternatively you can download a text file to save to your PC here
Access for this product can only be controlled via the iControl Professional. For details on how to set access for this product please see the instructions for the TIS iControl Professional.
Current version of the is v. Release date of the current version is .
To check the version of this product you are running please follow these steps:
- On the iControl, click the icon at the bottom for the , on the page press the configuration button in the top right hand corner
- In the dialog box that drops down the version number for the product you have can be found here where it states "Your Version: Version". Version is the version number of your current product.
If you are running an out of date version, please obtain a redelivery of the product package from our redelivery board in our store, Click here to go there!
Listed here are the most common FAQ's for this product. Before contacting support, make sure your query is not answered here.
-
- Fixed bug where having 2 rigs out on same channel, did not control both rigs only the master rig. Fixed and now both rigs on same channel are controlled together.
- Version 1.10 - 2022-09-09
-
- Addition of using Gobos in Beam projection (50 preloaded!) - Any current presets you have created will need to be amended to handle gobos in this format:
BEAM:[AFFECTED]:[<COLORS>]:[Bracket MOVEMENT or angle]:[Head MOVEMENT or angle]:[PATTERN]:[GOBO]:[SPEED] - Addition of fade enabling lights to move smoothly to specific angles
- Addition of using Gobos in Beam projection (50 preloaded!) - Any current presets you have created will need to be amended to handle gobos in this format:
- Version 1.00 - 2019-06-19
-
- First Version